Step by Step Read Android Logs using ADB Logcat in Ubuntu

Having ADB Logcat will be helpful in debugging our android application to check important logs for troubleshooting purposes.

Using Ubuntu as your main operating system, you might come across this matter on how to debug our device application easily?

Instead of installing doubtful Logcat applications on Google Play Store why not we just do it ourselves?
Android Apps Awesome!

Steps to Read Android Application Logs in Ubuntu using ADB Logcat.

1. Enable the developer mode in our Phone 

This step varies from different phone models. Please checkout you phone-specific instructions to enable developer mode

2. Then enable the USB debugging in our phone 

Usually in Settings > Additional Settings > Developer Options > Usb Debugging

3. Install the ADB tools 

sudo apt install adb

4. Plug in the phone ensure that Ubuntu recognizes the phone you can see the "Android" / Phone device is mounted properly  

5. Now run the ADB command to list available device  

adb devices
You can see something like this.
List of devices attached 54ecd46b7d73 unknown

6. Go to phone and allow USB debugging from the android device  
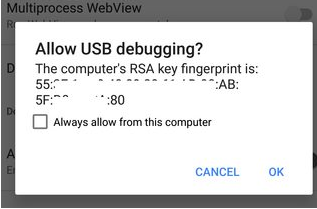
Dialog Prompt for RSA key Android USB Debugging

7. Now if you run 'adb devices' command you will see listed attached changed from 'unknown' to 'device'

List of devices attached 54ecd46b7d73 device

8. You are good to go now! ok let's run the ADB Logcat

adb logcat
Ok, you will see a lot of logs streaming out. This will not be easy for us to read right!

8. Lets filter to our specific application!. Ok now I'm going to filter to my apps called Foodah

adb logcat | grep foodah
Now i can see only my apps logs :D yay example
04-06 15:07:17.617 1416 2526 D PerfShielderService: com.xxxxxxxxxx.foodah|com.xxxxxxxxxx.foodah/com.xxxxxxxxxx.foodah.MainActivity|116|24xxxxxxxxx754xxx1|56|5|4

If you still stuck after the phone is mounted properly on Ubuntu.. try to restart the ADB server

Run the following command
sudo adb kill-server; sudo adb start-server
and repeat step 5-8! Good luck. Drop me a comment if you stuck anywhere, I'll try my best to reply :D

Comments

Popular posts from this blog

C# Serialization Tutorial Part 1 : Serialize object in file stream

Hello Peeps. Came across this topic while doing our game saving data feature. this post only cover basic serialization. basically serialization help us to convert our object into stream of bytes so that our object can be stored or transmit over in memory/file/database. before we can proceed with the serialization tutorial, we need to set the user permission to our target folder path. 1. Set the folder path to be accessible and can be override. This step is to avoid our program/apps from throwing unauthorizedaccessexception.    - for my scenario, im choosing the path of D:\SelfLearning\c#\Serialization to store my data file. Right click the target folder, select on Security tab Select on Users and give full control or modify permission to the user. 2. Now we are going to write our code. First we need to setup our folder path. 3. We going to create our file.  In this tutorial we are using FileStream type, other then FileStream, we can make use of MemoryStream i

Tutorial on Min3D framework using Android Studio

Salam peeps, UPDATES***, the model on the old link is no longer working. so i have create a github repo, where i put the source code in a project, you guys can try to clone in and run on your android studio device emulator or directly on your phone, Ive replaced the model with a cube. https://github.com/aliaramli/Min3DTutorial Previously i ve posted tutorial on min3D using eclipse IDE, i believe most of us has moved to Android Studio IDE in developing android apps? As previous tutorial shows a lot of support from readers and among hot post in my blog, i ve decided to post the same tutorial but this time using Android Studio. For those who are familiar with Eclipse/Android Studio migration they might not have problem in running this tutorial . For more detail explanation on min3D please visit this website page Ok lets get started. Step One Create a new android project in android studio. you may name it as what you like, below are how i defined my project settings.

Tutorial on min3d framework

Salam all. This time I want to share a bit, how I tried out the mid3d framework for the first time. Acknowledge that I am new to android development.   I just follow the tutorial on Mat-d website but there are certain things that I don’t understand how they actually work. Thus I want to share what I did step by step to make this example work. For explanations on coding/steps or errors please visit Mat-d website here J you ll understand more …. mat-d original tutorial load a 3d obl model with min3d for android Step one . Download min3d into your eclipse . Select File>Import>SVN>Checkout projects from SVN Next. Choose radio button : Create a new repository location Next. Enter the svn location http://min3d.googlecode.com/svn/trunk the thing that we want to check out from the svn is the min3d framework code. Step two. Download obj file  www.3dvia.com …you need to register first..it has free acc version.. and download the followin