Salam peeps,
UPDATES***, the model on the old link is no longer working. so i have create a github repo, where i put the source code in a project, you guys can try to clone in and run on your android studio device emulator or directly on your phone, Ive replaced the model with a cube.
https://github.com/aliaramli/Min3DTutorial
Previously i ve posted tutorial on min3D using eclipse IDE, i believe most of us has moved to Android Studio IDE in developing android apps?
As previous tutorial shows a lot of support from readers and among hot post in my blog, i ve decided to post the same tutorial but this time using Android Studio.
For those who are familiar with Eclipse/Android Studio migration they might not have problem in running this tutorial.
For more detail explanation on min3D please visit this website page
Ok lets get started.
Step One
Create a new android project in android studio. you may name it as what you like, below are how i defined my project settings.


new Activity class created as defined above.
Step two
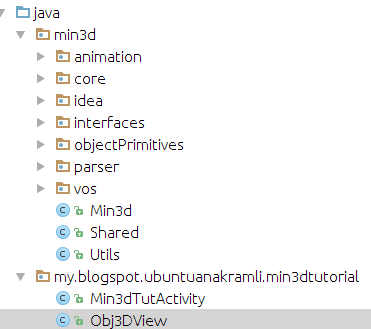
Create a package name min3d under java folder as below

Step three
Checkout the min3d framework code from SVN into our new project.
SVN path : http://min3d.googlecode.com/svn/trunk
**UPDATED..use github source code for min3d library at https://github.com/mengdd/min3d
select only the min3d package under src
in checkout path, choose the newly create min3d package.

in end we can see under our android explorer checkout code added to the new min3d package. after checkout completed android studio will prompt to open the new checkout in another window. select open in another window. then you may close the newly open window and go back to our project window.

Step four
Download obj , mtl and png files from
www.3dvia.com …you need to register first..it has free acc version.. and download the following 3d model of a face http://www.3dvia.com/models/66964B5C6E405264/face
Change the face.obj into face_obj
Change the face.mtl into face_mtl
Change the image name to use all lowercase, as android doesnot allow images with capital letter.
from face_eyeL_hi.jpg to face_eyel_hi.jpg
from face_eceR_hi.jpg to face_ecer_hi.jpg
Step five
Edit face_mtl and face_obj
Edit the face_mtl into this. Notice the differences before this it has tabulation and spaces between lines.. this will not let our object to have textures..
ensure that the map_Kd face_eyel_hi.jpg above the Kd 0.7 0.7 0.7 repeat the same thing for other .jpg. please refer below.
IN face_obj
eyeL_hi to eyel_hi
and
ayeR_hi to eyer_hi
Step Six
Res folder
Under res folder create a folder name raw..
Insert the obj and mtl file inside that folder
It should be like this, if you cant see the newly create raw folder please refresh the res folder or rebuild project.

Under res folder create a folder name drawable
Insert all the model texture into it like picture below notice all names in lowercase

Step Seven
Code the main activity class as below.
Create a new class under your activity package, name the class as Obj3DView
***take note here the resource must be the same as you have declared mine one is "
Step Eight
Edit AndroidManifest.xml
change the activity name.
Step Nine
Run it!!
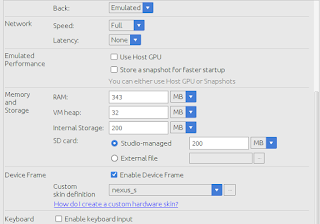
additional ** avd setting to run project in android emulator. else the app will
stopped itself, ensure that you uncheck the host gpu.

Result!

UPDATES***, the model on the old link is no longer working. so i have create a github repo, where i put the source code in a project, you guys can try to clone in and run on your android studio device emulator or directly on your phone, Ive replaced the model with a cube.
https://github.com/aliaramli/Min3DTutorial
Previously i ve posted tutorial on min3D using eclipse IDE, i believe most of us has moved to Android Studio IDE in developing android apps?
As previous tutorial shows a lot of support from readers and among hot post in my blog, i ve decided to post the same tutorial but this time using Android Studio.
For those who are familiar with Eclipse/Android Studio migration they might not have problem in running this tutorial.
For more detail explanation on min3D please visit this website page
Ok lets get started.
Step One
Create a new android project in android studio. you may name it as what you like, below are how i defined my project settings.


new Activity class created as defined above.
Step two
Create a package name min3d under java folder as below

Step three
Checkout the min3d framework code from SVN into our new project.
**UPDATED..use github source code for min3d library at https://github.com/mengdd/min3d
select only the min3d package under src

in checkout path, choose the newly create min3d package.

in end we can see under our android explorer checkout code added to the new min3d package. after checkout completed android studio will prompt to open the new checkout in another window. select open in another window. then you may close the newly open window and go back to our project window.

Step four
Download obj , mtl and png files from
Change the face.obj into face_obj
Change the face.mtl into face_mtl
Change the image name to use all lowercase, as android doesnot allow images with capital letter.
from face_eyeL_hi.jpg to face_eyel_hi.jpg
from face_eceR_hi.jpg to face_ecer_hi.jpg
Step five
Edit face_mtl and face_obj
Edit the face_mtl into this. Notice the differences before this it has tabulation and spaces between lines.. this will not let our object to have textures..
ensure that the map_Kd face_eyel_hi.jpg above the Kd 0.7 0.7 0.7 repeat the same thing for other .jpg. please refer below.
newmtl Texture0
Ns 20
d 1
illum 2
map_Kd face_eyel_hi.jpg
Kd 0.7 0.7 0.7
Ks 0 0 0
Ka 0 0 0
newmtl Texture1
Ns 20
d 1
illum 2
map_Kd face_eyer_hi.jpg
Kd 0.7 0.7 0.7
Ks 0 0 0
Ka 0 0 0
newmtl Texture2
Ns 20
d 1
illum 2
map_Kd face_skin_hi.jpg
Kd 0.7 0.7 0.7
Ks 0 0 0
Ka 0 0 0
newmtl Texture3
Ns 20
d 1
illum 2
map_Kd face_sock.jpg
Kd 0.7 0.7 0.7
Ks 0 0 0
Ka 0 0 0
IN face_obj
eyeL_hi to eyel_hi
and
ayeR_hi to eyer_hi
Step Six
Res folder
Under res folder create a folder name raw..
Insert the obj and mtl file inside that folder
It should be like this, if you cant see the newly create raw folder please refresh the res folder or rebuild project.

Under res folder create a folder name drawable
Insert all the model texture into it like picture below notice all names in lowercase
Step Seven
Code the main activity class as below.
package my.blogspot.ubuntuanakramli.min3dtutorial;

import android.app.Activity;
import android.support.v7.app.AppCompatActivity;
import android.os.Bundle;
import android.view.Menu;
import android.view.MenuItem;

public class Min3dTutActivity extends Activity {

    @Override    protected void onCreate(Bundle savedInstanceState) {
        super.onCreate(savedInstanceState);
        setContentView(R.layout.activity_min3d_tut);
    }

    @Override    public boolean onCreateOptionsMenu(Menu menu) {
        // Inflate the menu; this adds items to the action bar if it is present.        getMenuInflater().inflate(R.menu.menu_min3d_tut, menu);
        return true;
    }

    @Override    public boolean onOptionsItemSelected(MenuItem item) {
        // Handle action bar item clicks here. The action bar will        // automatically handle clicks on the Home/Up button, so long        // as you specify a parent activity in AndroidManifest.xml.        int id = item.getItemId();

        //noinspection SimplifiableIfStatement        if (id == R.id.action_settings) {
            return true;
        }

        return super.onOptionsItemSelected(item);
    }
}
Create a new class under your activity package, name the class as Obj3DView

package my.blogspot.ubuntuanakramli.min3dtutorial;

import min3d.core.Object3dContainer;
import min3d.core.RendererActivity;
import min3d.parser.IParser;
import min3d.parser.Parser;
import min3d.vos.Light;
public class Obj3DView extends RendererActivity {
    private Object3dContainer faceObject3D;
    /** Called when the activity is first created. */    @Override    public void initScene()
    {
        scene.lights().add(new Light());
        scene.lights().add(new Light());
        Light myLight = new Light();
        myLight.position.setZ(150);
        scene.lights().add(myLight);
        IParser myParser = Parser.createParser(Parser.Type.OBJ, getResources(), "my.blogspot.ubuntuanakramli.min3dtutorial:raw/face_obj",true);
        myParser.parse();
        faceObject3D = myParser.getParsedObject();
        faceObject3D.position().x = faceObject3D.position().y = faceObject3D.position().z = 0;
        faceObject3D.scale().x = faceObject3D.scale().y = faceObject3D.scale().z = 0.009f;
        // Depending on the model you will need to change the scale faceObject3D.scale().x = faceObject3D.scale().y = faceObject3D.scale().z = 0.009f;        scene.addChild(faceObject3D);
    }
    @Override    public void updateScene() {
        faceObject3D.rotation().x += 0.5;
        faceObject3D.rotation().z += 1;
    }
}
***take note here the resource must be the same as you have declared mine one is "
"my.blogspot.ubuntuanakramli.min3dtutorial:raw/face_obj"IParser myParser = Parser.createParser(Parser.Type.OBJ, getResources(), "my.blogspot.ubuntuanakramli.min3dtutorial:raw/face_obj",true);
Step Eight
Edit AndroidManifest.xml
change the activity name.
<activity    android:name=".Obj3DView"    android:label="@string/app_name" >
    <intent-filter>
        <action android:name="android.intent.action.MAIN" />
        <category android:name="android.intent.category.LAUNCHER" />
    </intent-filter>
</activity>
Step Nine
Run it!!
additional ** avd setting to run project in android emulator. else the app will
stopped itself, ensure that you uncheck the host gpu.


Result!

nice tuto bro but the screen is still black and i have no idea why
ReplyDeletesorry late reply is it still happening? did you set the avd correctly?
DeleteThe bug has been fixed, you have to add " scene.addChild(faceObject3D); "in initscene function.You can check in my repository
Deletehttps://github.com/ImDroidGuy/Android3D-min3d-Example
@Override public void initScene()
{
scene.lights().add(new Light());
Light myLight = new Light();
myLight.position.setY(150f);
scene.lights().add(myLight);
IParser myParser = Parser.createParser(Parser.Type.OBJ, getResources(), "guy.droid.im.minthreed:raw/face_obj",true);
myParser.parse();
faceObject3D = myParser.getParsedObject();
faceObject3D.position().x = faceObject3D.position().y = faceObject3D.position().z = 0;
faceObject3D.position().z =-.2f;
faceObject3D.scale().x = faceObject3D.scale().y = faceObject3D.scale().z = .009f;
scene.addChild(faceObject3D); /** Add This Line **/
// Depending on the model you will need to change the scale faceObject3D.scale().x = faceObject3D.scale().y = faceObject3D.scale().z = 0.009f; scene.addChild(faceObject3D); */
}
any error?
ReplyDeletemine is black too
ReplyDeleteThe bug has been fixed, you have to add " scene.addChild(faceObject3D); "in initscene function.You can check in my repository
Deletehttps://github.com/ImDroidGuy/Android3D-min3d-Example
@Override public void initScene()
{
scene.lights().add(new Light());
Light myLight = new Light();
myLight.position.setY(150f);
scene.lights().add(myLight);
IParser myParser = Parser.createParser(Parser.Type.OBJ, getResources(), "guy.droid.im.minthreed:raw/face_obj",true);
myParser.parse();
faceObject3D = myParser.getParsedObject();
faceObject3D.position().x = faceObject3D.position().y = faceObject3D.position().z = 0;
faceObject3D.position().z =-.2f;
faceObject3D.scale().x = faceObject3D.scale().y = faceObject3D.scale().z = .009f;
scene.addChild(faceObject3D); /** Add This Line **/
// Depending on the model you will need to change the scale faceObject3D.scale().x = faceObject3D.scale().y = faceObject3D.scale().z = 0.009f; scene.addChild(faceObject3D); */
}
Black too
ReplyDeleteany error and did you use the right avd settings?
DeleteThe bug has been fixed, you have to add " scene.addChild(faceObject3D); "in initscene function.You can check in my repository
Deletehttps://github.com/ImDroidGuy/Android3D-min3d-Example
@Override public void initScene()
{
scene.lights().add(new Light());
Light myLight = new Light();
myLight.position.setY(150f);
scene.lights().add(myLight);
IParser myParser = Parser.createParser(Parser.Type.OBJ, getResources(), "guy.droid.im.minthreed:raw/face_obj",true);
myParser.parse();
faceObject3D = myParser.getParsedObject();
faceObject3D.position().x = faceObject3D.position().y = faceObject3D.position().z = 0;
faceObject3D.position().z =-.2f;
faceObject3D.scale().x = faceObject3D.scale().y = faceObject3D.scale().z = .009f;
scene.addChild(faceObject3D); /** Add This Line **/
// Depending on the model you will need to change the scale faceObject3D.scale().x = faceObject3D.scale().y = faceObject3D.scale().z = 0.009f; scene.addChild(faceObject3D); */
}
Hey, Thank you for your tutorials. I was able to upload it and also was able to append code for zoom and drag. There are examples in min3d, like here
ReplyDeletehttp://www.java2s.com/Open-Source/Android_Free_Code/OpenGL/library/com_min3dExampleInsideLayout_java.htm
That say that I can include this inside a layout. But, for some reason, I am not able to do that. I get the object at the centre and its black surrounding it. Any thoughts.?
Great Tuts ! its Working. Check my Repository for this example
ReplyDeletehttps://github.com/ImDroidGuy/Android3D-min3d-Example
This comment has been removed by the author.
Deleteto Mohamed Rashik, can tell me how import the library min3d in android ? please.help
DeleteHow can I interact with 3d object with touch?
ReplyDeleteSVN cannot checkout the repo
ReplyDeletetry check this out https://github.com/mengdd/min3d
Deleteon github, my link is outdated.
Hi, I having a error when parsing the object from the raw folder.
ReplyDeleteBtw. here is my code
package es.esy.computerdiagnosticapp.computerdiagnosticandroidapplication;
import android.support.v7.app.AppCompatActivity;
import android.os.Bundle;
import android.widget.LinearLayout;
import min3d.core.Object3dContainer;
import min3d.core.RendererActivity;
import min3d.objectPrimitives.Box;
import min3d.parser.IParser;
import min3d.parser.Parser;
import min3d.vos.Light;
public class ComputerParts3D extends RendererActivity {
Object3dContainer _cube, objModel;
@Override
protected void onCreate(Bundle savedInstanceState) {
super.onCreate(savedInstanceState);
setContentView(R.layout.activity_computer_parts3_d);
LinearLayout ll = (LinearLayout) findViewById(R.id.ll);
ll.addView(_glSurfaceView);
}
@Override
public void initScene() {
scene.lights().add(new Light());
scene.backgroundColor().setAll(0xff444444);
// _cube = new Box(1,1,1);
IParser myParser = Parser.createParser(Parser.Type.OBJ, getResources(), "es.esy.computerdiagnosticapp.computerdiagnosticandroidapplication:raw/motherboard_obj",true);
myParser.parse();
objModel = myParser.getParsedObject();
objModel.scale().x = objModel.scale().y = objModel.scale().z = .7f;
scene.addChild(objModel);
// scene.addChild(_cube);
}
@Override
public void updateScene()
{
// _cube.rotation().y++;
}
}
when the application is running and executing the code myParser.parse();
my app is closing.
This comment has been removed by the author.
ReplyDeleteOk, its been a while since you wrote this... so far I have the Min3d package in the project. It seems though that the web site hosting the model has changed. Can you make the example more general, not relying on a 3rd party to maintain this media?
ReplyDeleteHi ive created a github repo, you can refer or run the android project, git@github.com:aliaramli/Min3DTutorial.git
Deleteyes you are right the website has no longer have the 3d model, so i used a normal cube object.
This comment has been removed by the author.
ReplyDeleteI am trying to load another 3d obj file its giving an error continuously
ReplyDelete04-20 03:27:33.335 23517-23541/? W/ResourceType: No package identifier when getting value for resource number 0x00000000
04-20 03:27:33.387 23517-23541/guy.droid.im.minthreed E/AndroidRuntime: FATAL EXCEPTION: GLThread 3862
Process: guy.droid.im.minthreed, PID: 23517
android.content.res.Resources$NotFoundException: Resource ID #0x0
at android.content.res.Resources.getValue(Resources.java:1266)
at android.content.res.Resources.openRawResource(Resources.java:1181)
at android.content.res.Resources.openRawResource(Resources.java:1158)
at min3d.parser.ObjParser.readMaterialLib(ObjParser.java:175)
at min3d.parser.ObjParser.parse(ObjParser.java:107)
at guy.droid.im.minthreed.MainActivity.initScene(MainActivity.java:28)
at min3d.core.Scene.init(Scene.java:254)
at min3d.core.Renderer.onSurfaceCreated(Renderer.java:75)
at android.opengl.GLSurfaceView$GLThread.guardedRun(GLSurfaceView.java:1500)
at android.opengl.GLSurfaceView$GLThread.run(GLSurfaceView.java:1239)
04-20 03:31:13.780 23517-23541/guy.droid.im.minthreed I/Process: Sending signal. PID: 23517 SIG: 9
Can anyone please help how to interact with gestures using min3d?
ReplyDelete